A while ago – just to see if I could – I decided to record a song entirely on my phone. This was before I had my iRig, so I relied on my phone’s internal mic. I know right?
But, it’s not just my curiosity. Our focus is minimizing cost and space: obviously, that’s most easily achieved using stuff you already have.
Additionally, I was pissed off with the responses to people on Reddit asking for advice on music production, and specifying that they’re broke.
Usually the responses are that you can get a decent setup for less than $1,000. Or a decent laptop for less than $500. And for just a few more hundred bucks you can get decent DAW and monitors. And if you can’t afford that, get a job, save your money etc etc etc.
Nobody responding seemed to get that that’s a lot of money to somebody who’s broke.
And worst of all: discouraging people from creating music based on financial status.
Shut up. Get out. Check your damn privilege.
Recording on your phone: rig run down
- Samsung Galaxy S9 smartphone
- Cheap, everyday Sony earphones
- ASUS Chromebook Flip C100PA
- BandLab free, online, in-browser DAW
- Taylor TSBTe
- Epiphone Hummingbird
- Gibson C-1
- Acoustic guitar strings: Ernie Ball Earthwood Medium Light
- Classical guitar strings: Ernie Ball Ernesto Palla Nylon Black and Gold Ball End
- Jim Dunlop Gator Grip 1.14mm picks
- Chicken Shake egg shaker
- Unbranded star-shaped tambourine
Recording I Promise You on a phone
Firstly, I had to lay some ground rules:
- No drums
- It’s OK to use a computer for editing, mixing, and mastering
i just couldn’t envision how you might get a well-rounded, workable drum sound from a phone’s microphone. Because I don’t have an appropriate holder to place it, and I’m not sure where I would place it. Maybe that’s an adventure for another day.
In terms of using a computer to finish the song, it’s just easier and more accurate on the in-browser version of BandLab. And again, in terms of cost, everybody has one, or at the very least has access to one. With BandLab’s sync function, you can track on your phone, and edit etc in browser.
Besides, I had tinkered with a new song that I couldn’t hear drums for anyway, called I Promise You. But mostly, I was gifted a classical guitar by my SO’s aunt at Thanksgiving. And I really wanted to record it.
Also, I just wanted to use all my acoustic guitars to show how their different sound come together to make something lovely.
Step one – scratch track
As with any other recording, I started with a scratch track. It would establish the time and feel of the song, and provide guidance as I went along.
Firstly, playing to a click track, I recorded the basic chords of the song with my Hummingbird, then I just put a single vocal track on, also with the click.
Step two – guitars
As I have noted, this recording is all acoustic guitars.
Previously, acoustic guitars were based around the TSBTe and Hummingbird, playing open chords throughout the song, then panning one wide left, and the other wide right.
And that’s how I like it! I normally leave the more dynamic aspects of guitar work to electrics.
However, on this occasion, I needed to get some kind of interesting dynamics from the instruments in play. It worked out like this:
| Epiphone Hummingbird | Power chords on bass strings on verses; open chords on choruses | The Hummingbird’s full and mellow sound works as an equivalent to a solid body guitar with humbuckers |
| Taylor TSBTe | Open chords throughout | The TSBTe’s brighter sound works as an equivalent to a semi-hollow body guitar with humbuckers |
| Gibson C-1 | Picked notes; solo | As a classical guitar, the C-1 works best played fingerstyle, so picked notes, so an equivalent to a solid body guitar with single coil pickups |
Generally, I record guitar solos separately. However, on this occasion, I did not – I played all the lead parts right the way through on one track.
Step three – percussion
Ordinarily, I record shaker and tambourine separately. However, in the interest of hyper light recording, I decided to try and record shaker and tambourine on the same track. It looked like this.
Step four – vocals
Next, it was time to record vocals. Obviously my microphone stand isn’t designed for holding phones. It was time to make a contraption, involving my phone tripod and gaffa tape.
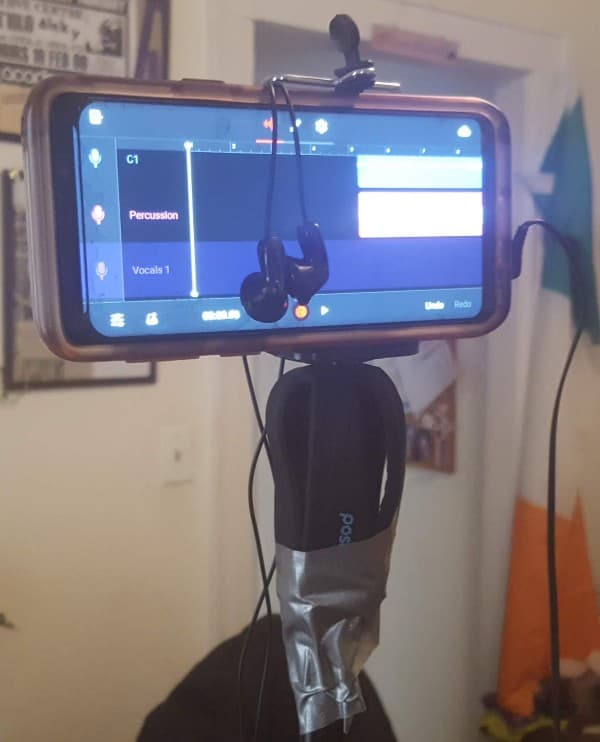
Although I normally record three tracks of lead vocals, and a further three tracks of backing vocals, on this occasion, I just recorded one lead vocal track, and one backing vocal track.
Step five – edit, mix, master
Because I essentially just lashed these tracks down, I had some editing to do, to adjust for latency issues.
Next, I added some compression according to my cheat sheet.
Then, I mixed the six tracks until I thought the sounds sounded as balanced as I liked. I still panned the Hummingbird and Taylor wide left and wide right.
Finally – as always – I clicked my way through BandLab mastering the song for free.
Bish bash bosh! Done!
‘I Promise You’ – recording music on your phone: conclusion
So, even more so than my usual disclaimer of light audio recording not sounding like Abbey Road, it’s specially applicable to I Promise You!
But, I don’t think it’s that bad! Certainly, I’ve heard unlistenable recordings that people actually parted with cash to produce.
Additionally, I’ve heard records where famous, multi-million dollar making musicians likely paid a producer hundreds of thousands of dollars to achieve a lo-fi sound like this.
However, I believe that the vocals are the weakest element of it. And not just because of my weak singing. Moreover, it’s the element of the song that was most obviously recorded on a phone.
But – and this is the important thing – this proves that you can start producing music with things you likely already have.
Furthermore, with BandLab, you don’t even need to own a computer, as long as you have access to one, whether that’s a family one, or at school, or in a library… wherever.
Overall, it’s got me rethinking the checklist for getting started with light audio recording, namely in terms of prioritizing its content.

If you found this helpful, subscribe on the right hand side of this page. You’ll be notified of new posts on Thursdays, inspiring you going into the weekend.
Share your own light audio recording thoughts and experiences! There’s a Facebook group, a Subreddit, Twitter and Instagram.
Also, feel free to shoot me a coffee!